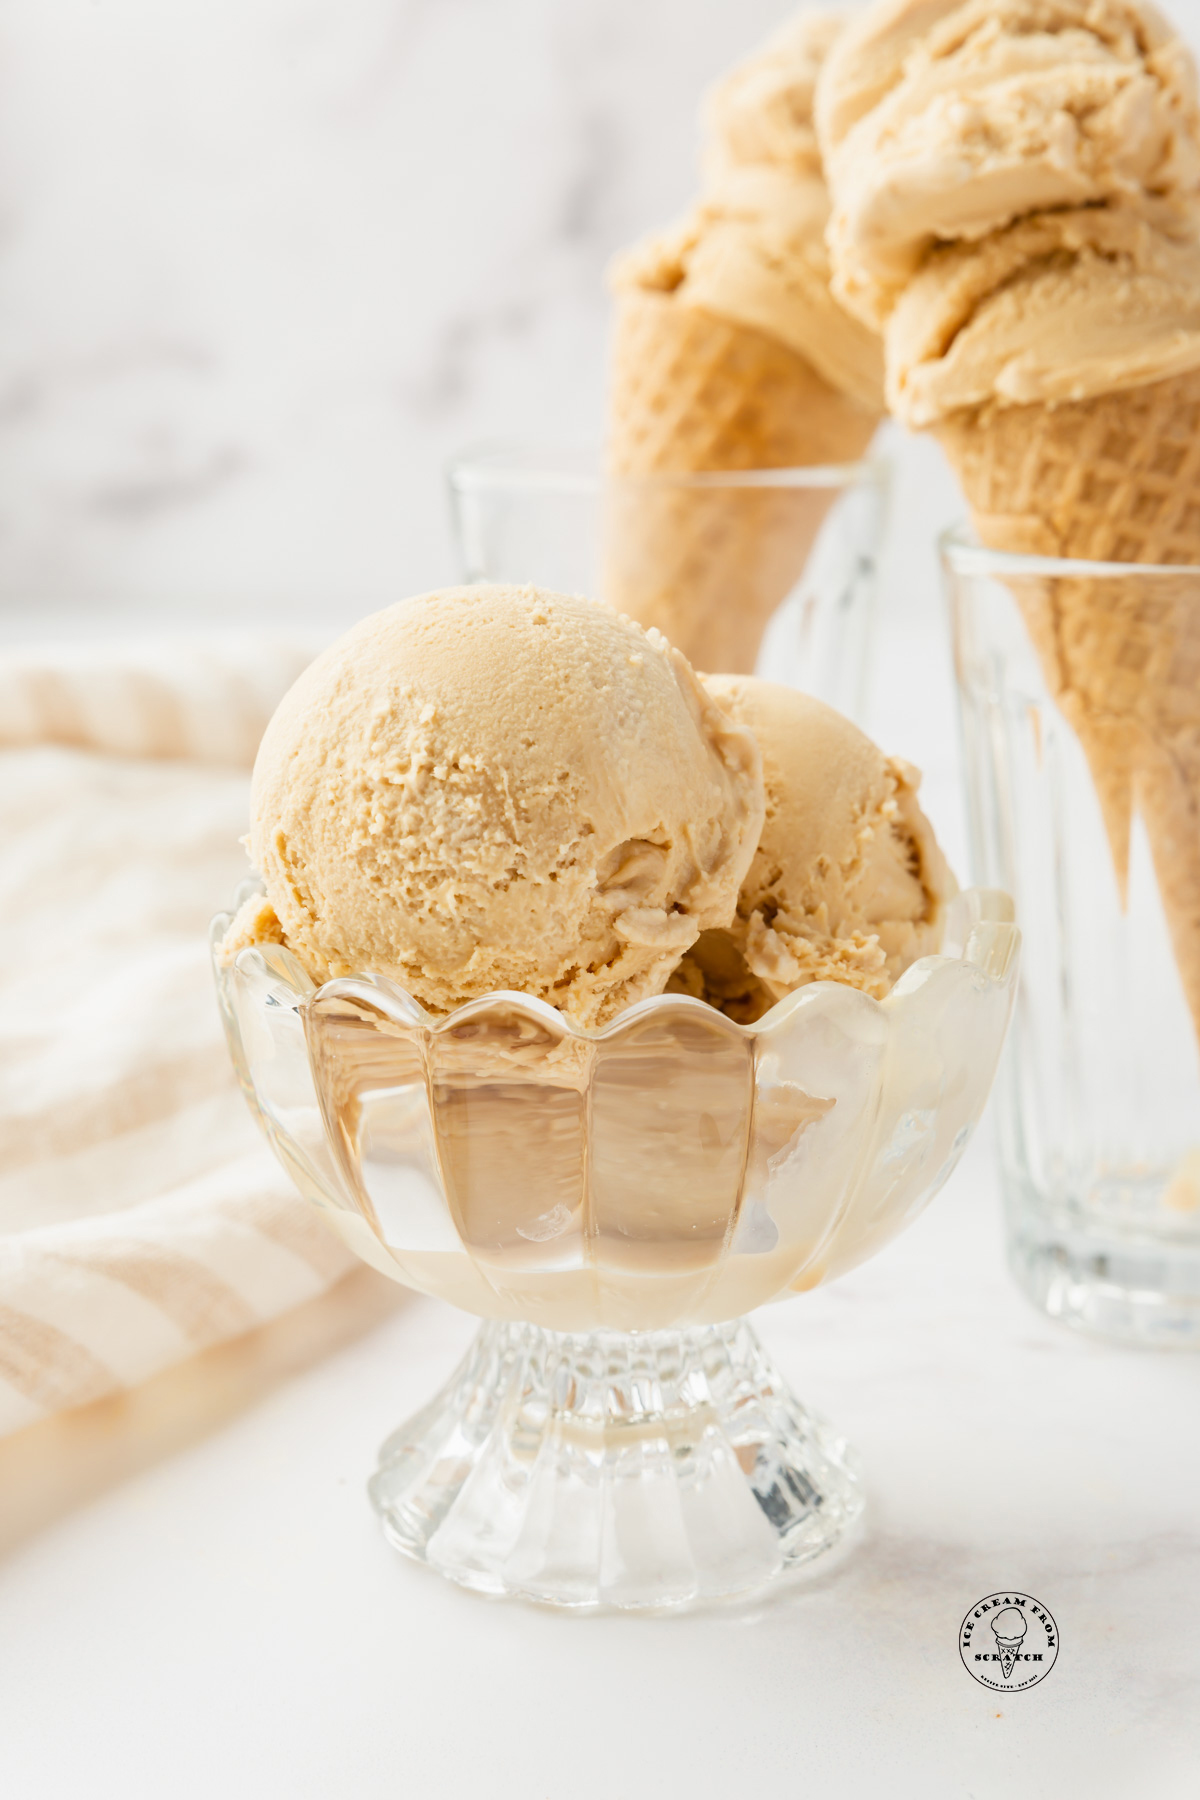
Imagine a dessert so luxurious, so utterly satisfying, that every spoonful transports you to a realm of creamy, buttery bliss. That, my friends, is the magic of homemade caramel ice cream. It's a sweet, rich symphony of deep caramel flavor, delicately swirling through a smooth, luscious base. While salted caramel has its legions of fans (a delicious tradition rooted in places like Brittany, France), this particular guide leans into pure, unadulterated sweetness – no salt, just indulgence.
Making caramel ice cream at home might sound daunting, but fear not! This isn't an impossible feat. It's a moderate-skill recipe that asks for a little patience and attention, rewarding you with an unparalleled treat that far surpasses any store-bought version. Whether you're aiming to impress guests at a backyard barbecue or simply seeking a quiet night in with a truly decadent dessert, this guide will walk you through every step to achieve creamy, dreamy caramel ice cream.
Why Homemade Caramel Ice Cream Reigns Supreme
There’s an undeniable charm to homemade desserts, and caramel ice cream is no exception. When you craft it yourself, you control every ingredient, ensuring a freshness and depth of flavor that's simply impossible to replicate from a carton. You'll experience the rich, almost smoky notes of perfectly cooked caramel, the velvety texture of a real custard base, and the satisfying knowledge that you created something truly extraordinary. Historically, caramel itself dates back to sophisticated French culinary traditions, where sugar was meticulously melted down to a perfect golden-brown hue, forming the foundation of countless sweet creations. Bringing this tradition into your own kitchen allows you to connect with that rich heritage while enjoying a dessert that speaks directly to your sweet tooth.
Beyond the superior taste, there's also the joy of the process. The aroma of simmering butter and brown sugar filling your kitchen is an experience in itself, building anticipation for the treat to come. Plus, knowing exactly what goes into your dessert means you can tailor it to your preferences, making it an even more personal and delightful experience. For those passionate about elevating their dessert game, there's truly no substitute for homemade.
Unlocking the Secret to Perfect Caramel Ice Cream: What to Expect
This recipe for caramel ice cream is designed for the home cook with a moderate skill level. Don't be intimidated by terms like "tempering eggs" or "making caramel from scratch" – we'll break down each process into manageable, confidence-boosting steps. The key is to approach it with a little focus and, most importantly, patience.
Your Timeline for Decadence:
- Prep Time: Approximately 15 minutes
- Cook Time: Roughly 30 minutes (focused attention during this phase)
- Chill/Freeze Time: A crucial 8 hours (or overnight) for optimal texture
- Total Time: Approximately 8 hours 45 minutes (mostly passive chilling, totally worth it!)
This recipe yields about 6 generous scoops of heavenly caramel ice cream. Planning a bigger gathering? Simply double the ingredients for double the joy!
Essential Gear for Your Ice Cream Adventure:
Having the right tools makes all the difference:
- Medium Saucepan: For crafting your caramel and warming your milk. A heavy-bottomed one is ideal for even heat distribution.
- Whisk: Your best friend for smooth caramel and lump-free custard.
- Mixing Bowls: Several are needed for separating ingredients and tempering.
- Fine Mesh Strainer: Absolutely essential for a silky-smooth custard, catching any bits of cooked egg or undissolved sugar.
- Ice Cream Maker: The star of the show for achieving that perfectly creamy consistency. If you don't have one, some no-churn methods exist, but for this recipe's intended texture, a machine is recommended.
Pro Tip: You can prepare the ice cream base up to two days in advance and store it in the refrigerator. This allows you to break up the process, making churn day less hectic and more enjoyable. A well-chilled base also churns more efficiently, resulting in a creamier final product.
Gathering Your Indulgent Ingredients
Every ingredient in this recipe plays a vital role in creating the ultimate caramel ice cream experience. Here’s what you'll need to create a truly rich and flavorful treat:
- 1/4 cup Butter: Unsalted is preferred for better control over the final sweetness, but salted works too (just slightly adjust any added salt). It's the base of our caramel, adding richness and a beautiful sheen.
- 1 cup Packed Brown Sugar: This is where the deep, molasses-rich caramel flavor truly shines. Packed brown sugar offers a more complex sweetness than white sugar.
- 1½ cups Heavy Cream (divided): Essential for the luscious, thick texture of your ice cream. Part of it goes into the caramel, and the rest forms the core of your custard.
- 4 Large Egg Yolks: These are the secret to a rich, silky, and stable custard base, providing both flavor and a luxurious mouthfeel.
- 1/2 cup Granulated Sugar: Used in the custard base, it complements the brown sugar caramel without overpowering it.
- 1½ cups Whole Milk: Contributes to the creamy consistency while keeping the overall richness balanced.
- 1/4 teaspoon Kosher Salt: Even in a sweet caramel, a tiny pinch of salt enhances all the other flavors, making them pop without tasting "salty."
- 1 teaspoon Vanilla Extract: A classic flavor enhancer that rounds out the caramel and dairy notes beautifully.
Smart Substitutions (Because Life Happens)
Don't have every ingredient on hand? No problem! Here are some common swaps:
- Brown Sugar Swap: If you're out of brown sugar, granulated white sugar can be used. Just be aware that it will result in a lighter-colored caramel with a milder, less complex flavor profile.
- Heavy Cream Alternative: For a slightly less rich but still delicious ice cream, you can substitute half-and-half for the heavy cream. The texture might be a touch lighter.
- Dairy-Free Options: For a dairy-free version, swap the whole milk for almond, oat, or soy milk. Keep in mind that the fat content difference may slightly alter the final texture, making it less rich or perhaps requiring a longer churn time.
- Salt Variations: If kosher salt isn't available, sea salt or regular table salt can be used. Just be sure to reduce the amount slightly, as they can be saltier by volume.
Insider Tip: For the smoothest possible base, allow all your dairy and egg ingredients to come to room temperature before you begin. This helps them incorporate more easily and prevents any temperature shock when combining hot and cold elements.
The Star of the Show: Crafting Your Caramel Sauce
The heart of your caramel ice cream lies in a perfectly cooked caramel sauce. This step requires a bit of attention, but the reward is immense.
- Melt & Combine: In a medium saucepan, melt the butter over medium heat. Once melted, stir in the brown sugar. Continue stirring constantly until the sugar completely dissolves and the mixture begins to bubble steadily. This usually takes about 3-4 minutes. The sauce will transform into a thick, glossy, and beautifully amber-hued syrup. Resist the urge to stir nonstop once the sugar melts; too much agitation can sometimes lead to crystallization.
- Add Cream & Cool: Carefully and slowly whisk in ½ cup of the heavy cream. Be prepared for a vigorous bubbling reaction – this is perfectly normal and expected as the cold cream hits the hot caramel. Continue to cook for another 1-2 minutes, stirring gently, until everything is smoothly combined and thickened slightly. Remove the saucepan from the heat and allow the caramel sauce to cool while you prepare the custard.
Building the Silky Custard Base
A rich, egg-yolk based custard is what gives homemade ice cream its luxurious texture and body. This is where you'll master the art of tempering.
- Whisk Eggs & Sugar: In a large mixing bowl, vigorously whisk the egg yolks and granulated sugar together until the mixture is pale yellow and thick, resembling a light cream. This process incorporates air and prepares the yolks for tempering.
- Warm the Milk: In a separate medium saucepan, combine the whole milk and kosher salt. Heat this mixture over medium heat, stirring occasionally, until it's steaming gently around the edges. Do not let it boil; just warm it enough to be hot to the touch.
- Temper the Yolks (The Delicate Dance): This is the most crucial step for a smooth custard. While continuously whisking the egg yolk mixture, slowly drizzle about half of the warm milk into the egg yolks. This gradually raises the temperature of the yolks without scrambling them. Once half the milk is incorporated, pour the tempered egg mixture back into the saucepan with the remaining warm milk.
- Cook the Custard: Return the saucepan to medium-low heat. Cook, stirring constantly with a wooden spoon or spatula, until the custard thickens enough to coat the back of the spoon. It should not boil. If it starts to simmer, immediately remove it from the heat. This typically takes 5-7 minutes.
- Strain for Silkiness: Immediately pour the hot custard through a fine-mesh strainer into a clean bowl. This removes any potential cooked egg bits or lumps, ensuring your ice cream base is incredibly smooth. Stir in the vanilla extract.
- Combine & Chill: Now, add the cooled caramel sauce to the strained custard base. Whisk gently until fully combined. Cover the bowl tightly with plastic wrap, pressing the wrap directly onto the surface of the custard to prevent a skin from forming. Refrigerate the base for at least 8 hours, or preferably overnight. A thoroughly chilled base is vital for proper churning. For more advanced tips on mastering caramel, check out Master Creamy Homemade Caramel Ice Cream: Recipe & Pro Tips.
Churning Your Way to Dreamy Caramel Ice Cream
After all the careful preparation, this is where your patience truly pays off. The churning process introduces air and breaks down ice crystals, giving your caramel ice cream its signature creamy texture.
- Prepare Your Ice Cream Maker: Ensure your ice cream maker's bowl is frozen solid (typically requires 12-24 hours in the freezer). Assemble your machine according to the manufacturer's instructions.
- Churn the Base: Pour the thoroughly chilled caramel ice cream base into the frozen bowl of your ice cream maker. Churn for 20-30 minutes, or until the mixture has thickened to the consistency of soft-serve ice cream. The exact time will vary based on your machine and the initial temperature of your base.
- Final Freeze: Transfer the soft-serve consistency ice cream into an airtight container. Press plastic wrap directly onto the surface, then seal the container with a lid. Place it in the freezer for another 4-6 hours to allow it to firm up to a scoopable consistency. This final freeze is essential for the perfect texture.
Once firm, your decadent caramel ice cream is ready to be enjoyed! Serve it simply in a bowl, or elevate it further with a sprinkle of toasted pecans, a drizzle of extra caramel sauce, or alongside a warm brownie or apple pie. The rich, buttery notes of this sweet caramel ice cream make it a versatile treat perfect for any occasion. If you're curious about the nuances of sweet vs. salted caramel, delve into Beyond Salted: Crafting Sweet, Buttery Caramel Ice Cream.
Making homemade caramel ice cream is more than just following a recipe; it's an experience in culinary creation. From the bubbling caramel to the silky custard and the final churn, each step builds anticipation for the incredibly rewarding outcome. The depth of flavor, the rich creaminess, and the sheer satisfaction of creating such a luxurious dessert from scratch are truly unparalleled. So, gather your ingredients, take a deep breath, and embark on this delicious journey. You're just a few steps away from enjoying the most decadent caramel ice cream you've ever tasted.
